Showing posts with label inspiration. Show all posts

July 27, 2010

From Kids Earrings to Sophisticated Necklaces to Wedding Jewelry...

Knowing that I start work in a little over a month (I AM LOVING THIS SUMMER-off STUFF!), I have been spending whatever minute I am not busy at church or with the house on, you guessed it, making jewelry :) Ah, this is the life. Where to being?


A few weeks ago a girl from my church was wearing some super cute earrings. I told her that I liked them... her mom told me that she loves wearing glamorous earrings...  but not the price tag. I told them I could teach her how to make them herself for free. Next think you knew, I had two 11-year old gals (the first brought a friend) and her mom at my kitchen table ready to learn! Making dangle earrings really is quite easy (and after this whole teaching lesson I am going to make a tutorial and start selling DIY earrings kits for kids - not sure why I didn't think of that before!), and these kids (and adult) got it with little instruction! Here is what they created in less than 2 hours!:

Needless to say, I was quite proud :)

Next on the list was several sets of bridal jewelry. Someone contacted me on Etsy awhile back and asked if I could make several sets of my pearl ball necklaces with matching earrings, though change up the color a bit to include white pearl ball rather than a salmon one. Consider it done!

After I sent Laura her earrings and necklaces (I threw in a set for the bride, too!), she wrote:
"I just got them- they are beautiful!!!!!!  I love how everything turned out- thank you so much!!  Thank you for including an extra for myself :) I put it on immediately haha (figure it has to go away till the wedding, but couldn't help myself)- they are so beautiful!!! Thank you so much for working with me on this- was a pleasure!! :) would def recommend to anyone who asks. Thanks again!!!!!!"


I also got a last-minute phone call from a few friends at church stating the need for a mother-of-the-bride necklace for a wedding a few days away! The gals brought the dress that the MOtB planned to wear and we collaborated to make a necklace/earring set of pearls and crystals - my favorite! Best of all, I spotted the MOtB at church the next weekend wearing the pearl and crystal earrings with white jeans and a blue shirt - it was an unexpected match made in heaven! I have since duplicated and posted the earrings on Etsy - thanks for the inspiration, ladies!

Last but most certainly NOT least, one of my most favorite customers turned dear friend (whom we met via this blog, actually!) commissioned me to make a necklace with a rather unique source of inspiration - the colors and art she plans to use for her baby's nursery! Nilsa plans to wear the necklace at her maternity photo shoot in a few weeks, and asked that we focus on turquoise, lime, and orange based on these pieces of art she is loving from Etsy (check out Nilsa's blog for the link to each piece!):
Focusing on the vibrant orange, turquoise, and lime color scheme Nilsa requested, I started by sending her a picture of some beads I had on hand that might work:
From there we agreed on these beads:
Now for the actual layout. I had some lofty ideas for this project, but after a few failed attempts, I knew I could easily do something like this as seen on Michael's.com:
Nilsa and I agreed on making the necklace 3-strands and measuring right above the bust... so I went to work and sent her these pictures along the way to make sure we were on the same page:
After getting her OK, I finished the wire strands off and put it all together on the toggle clasp!
This project was a great way to use some of the more upscale beads I have been collecting but too afraid to use up :) The turquoise, jade, and crystal beads make for one mighty fine statement necklace, if you ask me, and it's not made of plastic! Can't wait to see your maternity shots, Nilsa! Congrats on your pregnancy and thanks for allowing me to be a part of the celebration!

Oh, and I almost forgot. Bead Up has some VERY exciting news! Not only am I now an official business in the State of Missouri (it only took me 2 hours total to get it done - amen for the Midwest!), but I have set a date for the Second Annual Cupcakes, Cocktails, and Creations party! I have been working with local artists and bakers to get some other vendors in on the party, which will be held in my house (again, hooray for Midwest suburban super sizes!). Buckle up, Kansas City, and start saving your spare change!
So save the date for August 28th from 2-5! I couldn't be more excited!

April 2, 2010

Custom Lock and Key Necklace

A few weeks ago I blogged about making a series of custom Mustache necklaces for my high school buddy and Mustache connoisseur John. At the end of the post, I asked:

"Do you have a concept/idea that you would like to see Bead Up carry? I really dig these kinds of requests -- though to be fair, it may take a few months for me to find the parts! If you have a request and I successfully am able to carry it on my Etsy site, you will get a copy for FREE (unless it's one-of-a-kind, then I will include free shipping instead)!! So... leave a comment on this post or e-mail me! The next featured item could be yours (and could even be free)!"

My blogging buddy Linny wrote soon after with a really cool request: "For the past 4 years I've been shopping around for a necklace/charm that has something to do with a lock or locks. Lock is my married name and I have been wanting a necklace that I can wear proudly, so if you happen to be shopping and see an awesome lock type charm or something similar and are able to make a necklace out of it let me know and I'll buy it off of you. I totally trust your judgment in jewelry making."

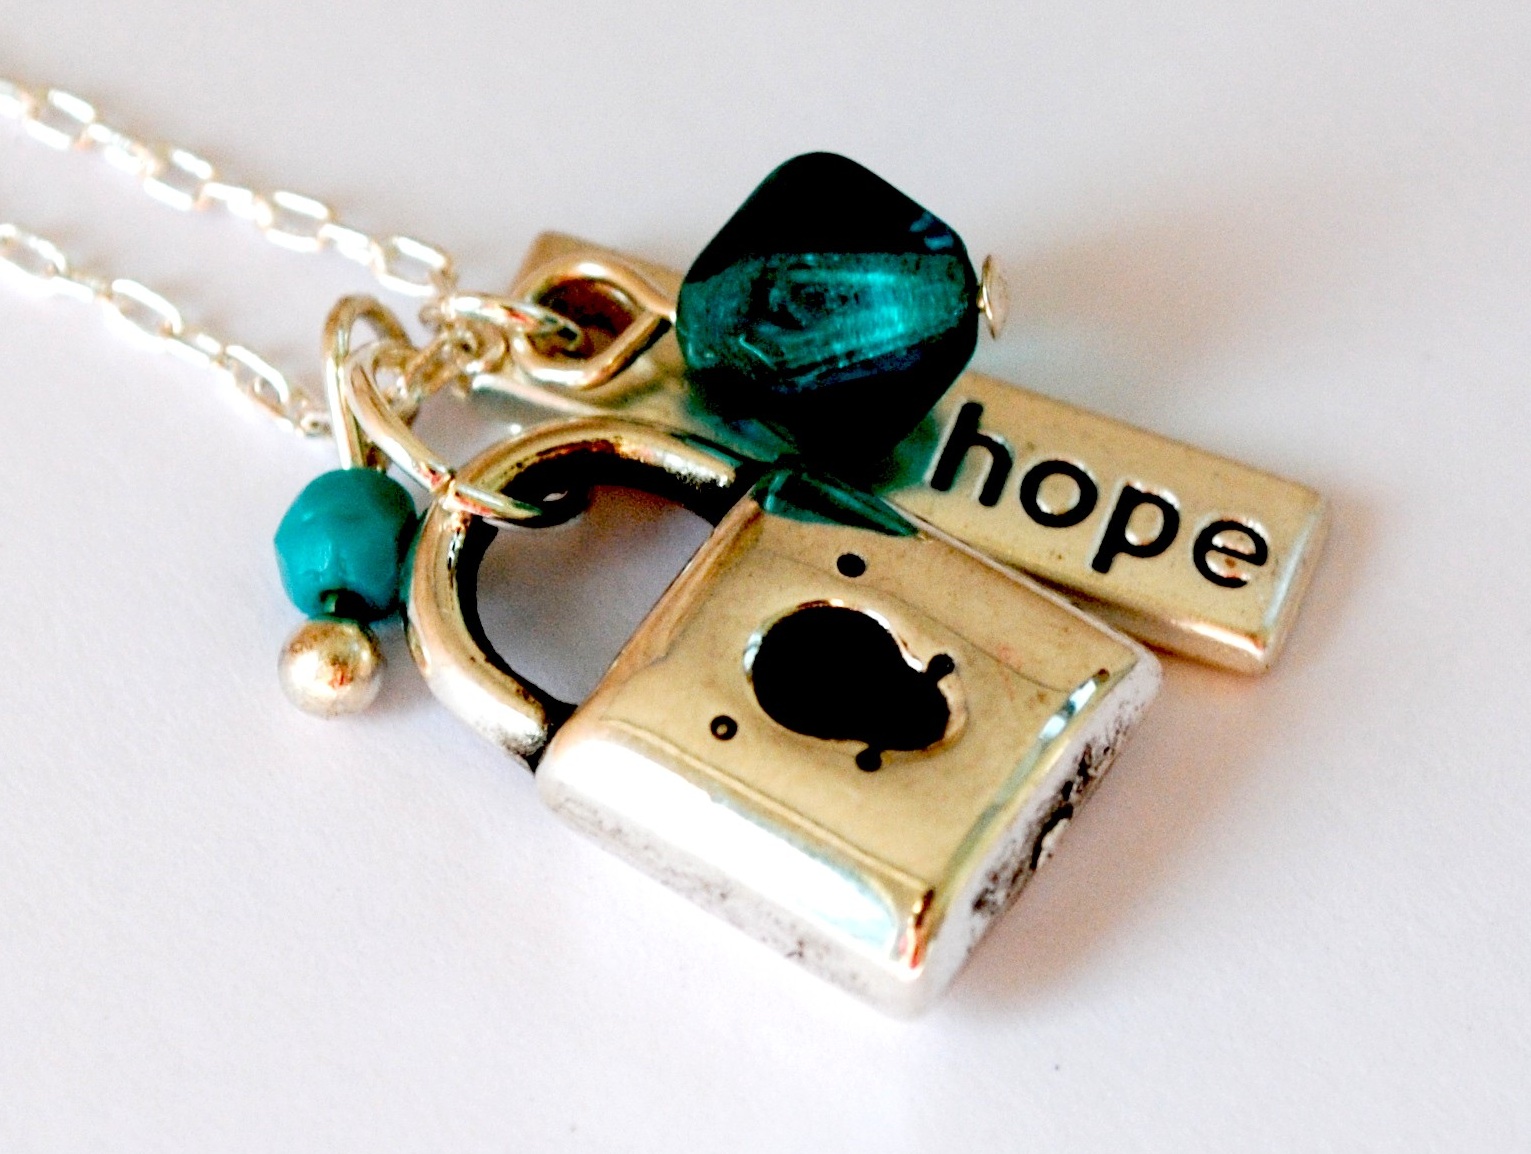
I found it TOTALLY ironic that Linny asked about a lock necklace because I had JUST purchased a bunch of lock and key charms based on this design I saw in InStyle magazine. I told Linny about the charm and asked if she would like any color added to the necklace and in what color: aquamarine and silver were my answers. And here is the result: 


Linny loved it. She wrote: "OMG, I love it! It's simple but not too simple :) The 'hope' charm does even it out. I really really like it."

Though Linny wanted to pay for it, I told her that it was on me since I had advertised to carry such a necklace for free on Etsy :) So here are the corresponding Etsy products:


Silver Lock and Key Gemstone Necklace

So, what do you think? And do you have any ideas for a piece for yourself or someone else that Bead Up could tackle?

Meanwhile, HAPPY EASTER! He is Risen!

March 30, 2010

Spring Collection: Inspiration and Preview

A few weeks ago the Hubs and I were at Crate and Barrel and I literally GASPED when I saw the color combination of these chopping boards:I of course had to buy the green one and couldn't get the color combination out of my head. Apparently, I went a little nuts later that day at Target:And Nordstrom Rack: And when I got home I realized that my garden was on the same page: Heck, even Ping's Frisbee was in my new color scheme of dreams! I of course looked through my bead collection to see what I could find. I came up with this little number: And have been busy buying beads and components in those colors ever since! More to come as I continue to work on my Spring 2010 Collection - coming to a blog and Etsy site near you soon! Meanwhile, here are a few other teasers from the collection that are currently on the Etsy site:
So, what inspires YOU this spring?

December 14, 2009

Custom Cowgirl Bracelet

I got a lot of custom orders during my jewelry party. Though this was totally thrilling, I will admit it was a bit overwhelming as the main thing I wanted to do after the months of preparation going into the party was to take a break from creating for a week or two! No rest for the weary! When my co-worker Melissa saw a Chinese-themed charm bracelet I had on display at the jewelry party, she immediately said "I want one like this!" I at first figured she wanted me to create a bracelet from scratch for her, though after meeting with her for breakfast one morning to discuss the bracelet (my first "consultation" of sorts!), Melissa explained that she had a sterling silver charm bracelet that she wanted to spice up. She presented me with 7 necklaces and bracelets from her "hippie days," all adorned with silver beads, turquoise, teek-wood, and coral. She had envisioned that I could take the beads from the necklaces and put them on the existing sterling bracelet. She found this picture as her inspiration: "The funky-chunkier, the better!" Melissa instructed. I'll see what I can do! I ordered some sterling ball-headed pins and a rustic looking sterling silver toggle clasp and went to work. I tore apart the necklaces and bracelets and took an inventory of what I had to work with: Here is the "before" picture of the sterling silver bracelet Melissa provided - with two headpins worth of beads for starters...And here is the after! Melissa LOVED the bracelet when I gave it to her at our company Christmas party - and went on to show and explain to EVERYONE at our table the story behind the piece! I will admit, this is not something I would think up to do on my own, but with the help of all the materials Melissa provided and the inspiration piece's picture, I think we hit the nail on the head! Check back on Wednesday for stories of how I commissioned others to make custom-pieces for me this week!

July 23, 2009

Another custom wedding bracelet

One day I am going to blog about how Facebook has been an amazing venue in my jewelry journey. I tell ya, I get about 1/3 orders via spreadin' the love on Facebook. This week's example: another custom bridal bracelet! High school friend and classmate, Sarah, saw me spreading the word on Facebook a few months ago and asked if I could make her a bracelet for her early August wedding. Seems like she did her research, as she said: "I really like the bracelet you wore at your wedding, and was thinking of something similar while I have been looking, because I don't want to go with a traditional diamond bracelet. I would like it to be more 'beady' vs. 'Stringy' (ie the stringy look is great, but with more beads). I also love the elegant clasp you put on a sample one that was on your website." No problem, Sarah! After seeing her wedding dress, I agreed that using ivory pearls and some crystals would go especially great with the beading detail on her dress (pictures to follow after the wedding event!). I got out my stash of pearls and crystals and decided to approach this one like I did my green with envy bracelet, but with some bead crimping and wire still showing. Since this is going to be a piece to be worn on a very important day, I used all sterling silver components - from the crimp beads to the wire to the clasp! I even managed to successfully sting the teeny, tiny 1mm pearl beads I bought in Chinatown last month, in addition to some 4mm pearls, 6mm pearls, and 8mm pearls. Add some clear Swarovski bicone beads (5mm and 8mm) and lots of love, and we have ourselves a bracelet!
Hope you like it, Sarah! Can't wait to see pictures!

July 9, 2009

The anatomy of a Bridesmaids Necklace

For the last few months I've been "sketching" if you will the layouts for a necklace for one of my own bridesmaids' weddings, Kelly, and her sisters, her bridesmaids. The wedding is this weekend, and I must admit, I am just now getting around to making the necklaces (thank you parents month long visit). It's not for lack of intent or interest, it's actually because I have been thinking and re-thinking the designs in my head over and over. And with little time left (I leave for the wedding tomorrow), I finally had to settle on a design and stick with it! Let's start with the bridesmaids necklaces. Kelly sent me this picture of what her sisters will be wearing and literally said to go to town and create whatever I wanted. I loved the color of the dress and it's strapless quality, and immediately thought that something like this necklace I made for my own rehearsal dinner outfit would be a good match, only in blue and pearls. When shopping in Chicago for beads, I stumbled across a ton of blue crystals and Czech glass beads. Then when shopping at my new favorite store in Chinatown, I found some SUPER cute (and affordable) teeny tiny pearls, which I figured would go GREAT with the ensemble (I'll be talking about them next week when I blog about the bride's necklace). A few things were going to be different with this necklace compared to it's inspiration piece. First, the components were much smaller than the red and black crystals (I am pretty sure these bridesmaids aren't as into funky chunky as I am). On the first piece, I used crimp beads to space the crystals out on a silver wire stringing thread (crimp beads are little silver beads that, when smashed on a wire, stick to it and can thus sandwich beads into place and give them a "floating" appearance). Since the beads I would be using for the bridesmaids necklaces were so small, I feared that the crimp beads, being around the same size as the beads themselves, would be a distraction. I thus invested in some illusion cord, which is essentially teeny tiny fishing wire (my first beading medium before I discovered Artbeads!). And since crimp beads were not an option, I invested in some jewelry glue, which I had never used before. (Thus the waiting until the last minute to make the necklaces - I was a little nervous about how they would turn out since I have never tried this technique before!) So, my materials included:
  • pearls (which measured 1-4mm each)
  • the blue crystals (3-5mm each)
  • the illusion cord (cut at about 20" each strand)
  • crimp beads and a crimping tool (to secure the ends of each strand)
  • the cement
  • sterling silver clasps and wire rings
  • and a paper bag on which to work (don't want any of that out-of-control cement on my dining room table, do we?)
First step was getting these bad boys glued on the super clear and super small string. This wouldn't have been so hard if 1.) the glue didn't come oozing out at an unstoppable force and 2.) if it didn't take a whole hour for the glue to dry! I put a drop of glue (well, that which I could contain) onto the string and then slid the bead over it. This made measuring the distance between the beads an additional challenge, but after awhile I was able to do 4-5 beads at a time before setting the strand down and repeating the process on another. After letting them sit overnight, I then crimped the ends of each strand so as to have a way of hanging them from the end clasp. To crimp, you simply place the crimp bead near the end of the stringing material (give yourself at least 2 inches), loop the string in the crimp bead, close the loop to measure about 4-6mm, and, with the crimping tool, smash the bead down. You then have a nice little and permanent loop (there is a way to make the crimp bead smaller and not as flat looking by folding it over on itself and re-smashing, but I have had terrible experience with that and only end up breaking the bead and losing the whole strand). Make sure the strand measures to your desired length before crimping - in this case, I made the necklaces 15" each, which means they will fall right on the collarbone. At first I had planned on doing many layers of these strands of pearls and crystals for each necklace, like the inspiration piece. However, the combination of the crazy amount of time it took for these things to dry and their delicate nature made me kind of fall in love with the simpler 2-strand look. So I took the two strands, looped them onto a spring ring, also looped a sterling silver clasp on a spring ring, and closed them off. Next thing you know - I had a necklace on my hands! I like the way they came out, even if it wasn't what I originally had envisioned. I think they will be subtle enough yet lovely enough to add just a touch of adornment to what the bridesmaids (who are both very slender gals) are wearing. I will of course take TONS of pictures this weekend and show you how they turned out! I posted this item on Etsy, too - though next time I will be better prepared to work with the crazy glue and it's delayed drying habits!