Showing posts with label ribbon. Show all posts

August 18, 2010

DIY::Salvaged Finds Turned To Jewelry Displays::PART 1

I have always been a Goodwill Stores kind of a gal. Even when I find something there that I don't need but see the $.49 price tag attached, I always seem to be able to justify the purchase. This was no exception when trying to think up new and useful ways to display my jewelry for my upcoming party.


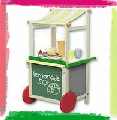
I have spent some of my recent free time getting to know my new neighborhood, which includes the local stores and dives. While rummaging around a Salvation Army store in town, I shopped this little guy: 


I immediately knew what I could do with it, and $.98 later it was mine! So after adding some black paper to it's back to give it less of a meshy look, I looked around my craft room to get some ideas of how to spruce the thing up. I knew just the remedy: paper flowers and brads! 
So a few floral arrangements later... 
And after adding some earrings, too...
We have this:
So, for less than $1 or so, I have a perfectly lovely earring holder. The paper holder also came with a magnet, which I think I will use to label the price for the earrings during the jewelry party. What do you think? 

Next on my list was to find a means to hang some longer necklaces I recently made for the jewelry party.  I remembered that I had some old cork boards we were saving to put up next to our dart board in the basement. Who needs darts when you have lots of jewelry to display? So I pulled them, and some old gift wrap, out of storage...
Turns out the cork boards (which we originally found in a free pile of stuff back in Berkeley) have warped pretty harshly over time, so they needed to be covered STAT!... 
After cutting the paper and taping it's edges down...
I added some torn paper around the border to give it some color, as well as a random flower I found laying the craft room. And VOILA! 
In fact, I used the rest of the torn pink paper to create it's counterpart:
I especially love the floral details: 
Though am not a huge fan of the only interesting push pins I could find in town - where can I get some cute silver matte pins without spending a fortune? 

Up next - how I turned a $.48 find into a necklace and earrings holder, plus a new use for an old lamp! 

August 9, 2010

Poke, string, knot, glue = DIY Fabric Beads! PART 2

Last week I blogged about how I painted and made some of my very own fabric beads (and was thrilled with the response the post got, too!). But painting and glueing was only the half of it! Once I started making the beads, I was unstoppable and kept finding new and different ways to use fabric already on hand and unconventional items from the craft store!


After painting my own beads, I started looking through my fabric vault (aka big ole' tupperware storage bin) to see what else I could come up with. Though I had purchased some super rad polka-dot Amy Butler fabric back in LA in order to make a pillow, I figured I could sacrifice a little bit for the cause. After cutting the fabric down to 1x3" strips, I needed a new venue on which to plaster the fabric (in other words - a cheap form of a bead)! After searching up and down the aisles of Michael's, I think I found the perfect (and cheap!) solution: Styrofoam Balls!


So with my styfoam balls in hand and fabric Mod Podge ready to go, I just now needed a way to make the hole and hold the bead while putting on the fabric. Of course - chopsticks!


I first glued a strip around the bead long ways:


Then finished with two more strips that went diagonally along the holes on either side. And Voila! A bead!


After pairing them with some more fabric-wrapped ugly disco ball beads and some brown wooden beads, I topped the necklace off with some pink ribbon and had this:
Amy Butler Fabric and Wooden Beaded necklace with Pink Ribbon, $20 


But what's a necklace without a matching bracelet, no?
Amy Butler "Love" Polka Dot Fabric Bracelet, $10
I might just keep this one. 

And of course I didn't stop there (and in fact, I hope to make many more of these items... I love 'em)! I was also determined to make something with this random piece of scarf-like fabric I bought for $.50 in LA awhile back:


After cutting a piece of fabric that measured about 3"x1", I got my styrofoam balls back out and went at it: 

And knotted and wrapped the fabric around the balls:


And came up with this thing-a-ma-bobber:


I will admit, the turnout of this necklace is now exactly what I had hoped for. It's quite stiff and down's hang all that nicely at the bust. My fabric was too wide and not long enough - I would have liked to make more knots and added more beads but ran out of length, plus I don't like how much fabric hangs from the sides. It's for all these reasons why this item isn't on Etsy yet - I am not 100% behind it. I do, however, plan to show it as an example at my jewelry party in a few weeks and see what kind of feedback I get on it and go from there. Though I love Etsy, using the internet to sell certain kinds of jewelry takes away the touch and feel dimension that is often so crucial to a good purchase!


Then I figured - if I could use fabric, why not use ribbon, too? After looking through my ribbon stash, I found this rad yarn-like stuff and paired it with some wooden-disc beads that I salvaged from an Anthropologie necklace I bought on sale years ago:
(Needless to say, I totally ruined my manicure with all my glue-use!)

Which resulted in these (the one on the right is actually made of fabric I painted blue):


And then this:


Again, I didn't put this item on Etsy yet because I am not totally settled with it. Maybe I am waiting for a perfect component piece to come my way. Maybe I am waiting for a better idea for their final use. Maybe I am just too stubborn to list them yet! This will be another item that will debut at the jewelry party in hopes of some constructive criticism. Ah, and artist's work is never done. 


Next up - how I used random stuff found at Goodwill to create one-of-a-kind jewelry displays for the party! Keep posted :)